What Causes Pigtails When Sanding Filler, Primer and Paint Prep? 7 Fixes Panel Shops Should Check First
SPX AbrasivesPublished 14 May 2026Updated 14 May 202611 min read
By SPX Abrasives | Published: 14 May 2026 | Updated: 14 May 2026
What Causes Pigtails When Sanding Filler, Primer and Paint Prep? 7 Fixes Panel Shops Should Check First
Pigtails usually point to a sanding system problem: dust, grit, pressure, pad condition, extraction or a disc that has gone past its useful life.
Pigtails are small curly or spiral sanding scratches left by a DA sander when the abrasive stops cutting cleanly across the panel. In a panel shop, they usually appear during bog (body filler) refining, primer sanding or fine paint prep when dust, trapped grit, a worn backing pad, weak extraction, skipped grit steps or heavy pressure interrupts the scratch pattern.
The frustrating part is timing. The repair can look fine under ordinary workshop light, then the marks show after guide coat, primer, basecoat or a metallic colour. That means rework. And most of the time, the fault is not mysterious. Something in the sanding setup has started dragging contamination, pressure or old scratches across the job.
This guide is written for Australian panel shops using 150mm DA sanding setups on filler, primer and pre-paint prep. It is built around a simple workshop pattern: symptom, likely cause, what to check, fix.
Quick answer for panel shops
If you are seeing sanding pigtails, check these first:
What to check
Why it matters
Fast fix
Dust or grit under the disc
Loose debris gets trapped and dragged in a spiral pattern.
Blow off, vacuum, wipe and fit a clean disc before continuing.
Loaded or worn disc
A dull or packed abrasive skates instead of cutting cleanly.
Replace the disc before it turns shiny, clogged or patchy.
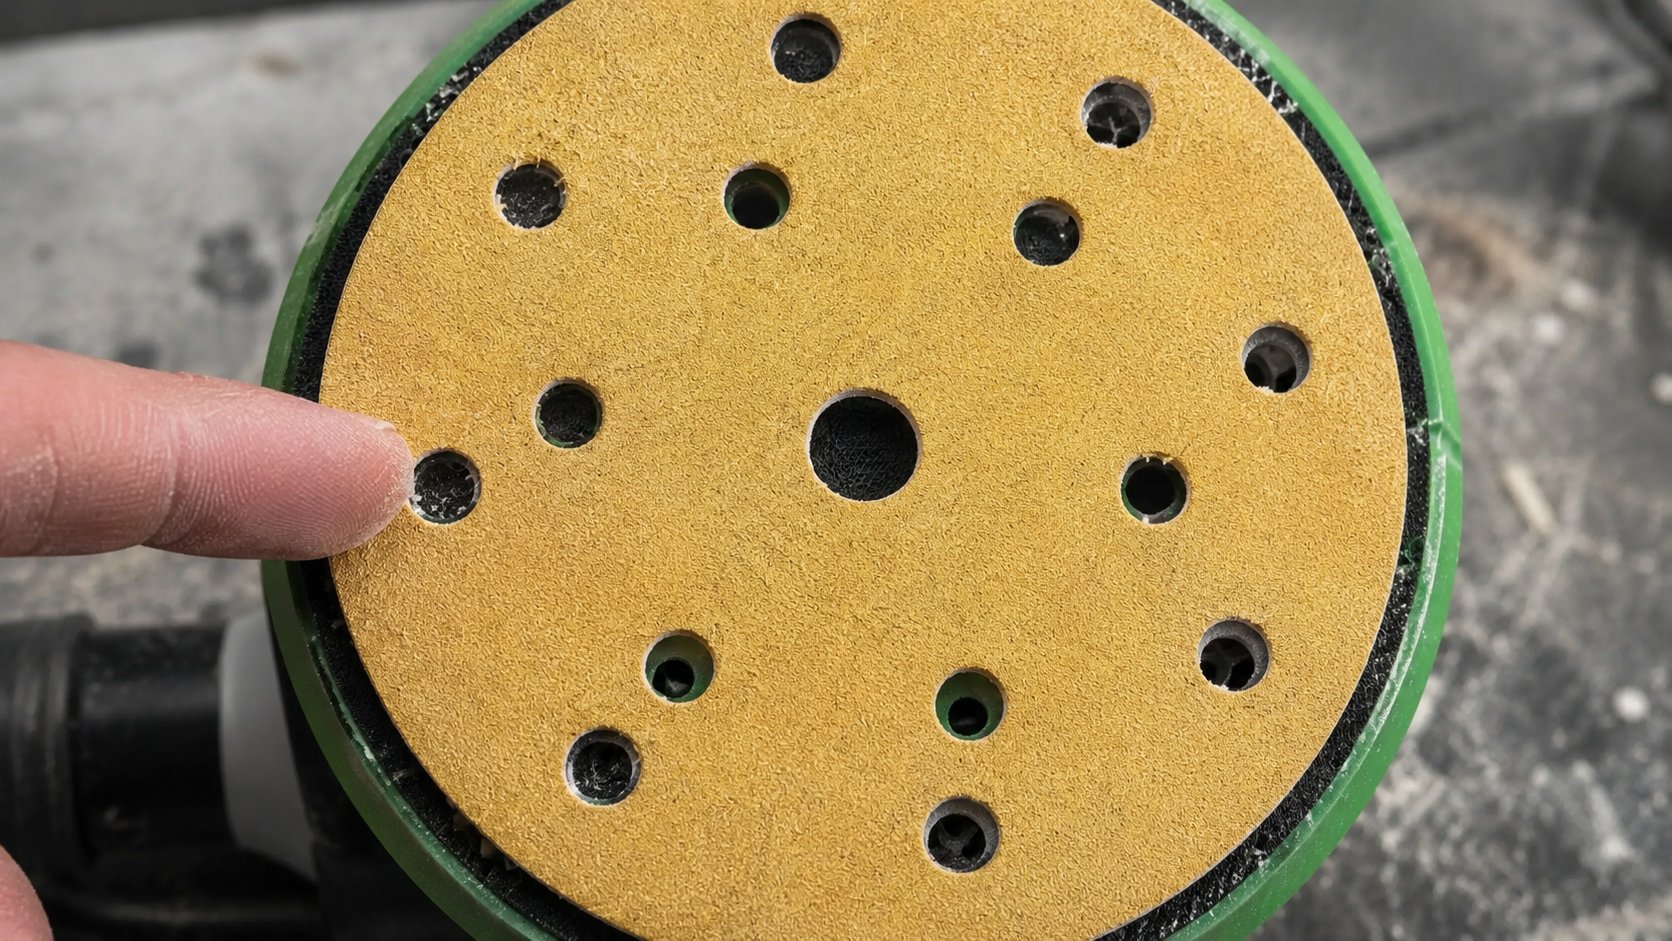
Backing pad condition
A worn pad creates uneven pressure and poor disc contact.
Inspect hooks, pad edges, pad flatness and the interface pad.
Dust extraction
Weak suction leaves sanding dust sitting under the abrasive.
Check hose, filter, cuff seal, pad holes and disc alignment.
Grit progression
Skipped steps leave scratches the next grit cannot remove properly.
Work through the grades instead of jumping too fine too early.
DA pressure and angle
Leaning hard or tilting the sander makes the disc edge bite.
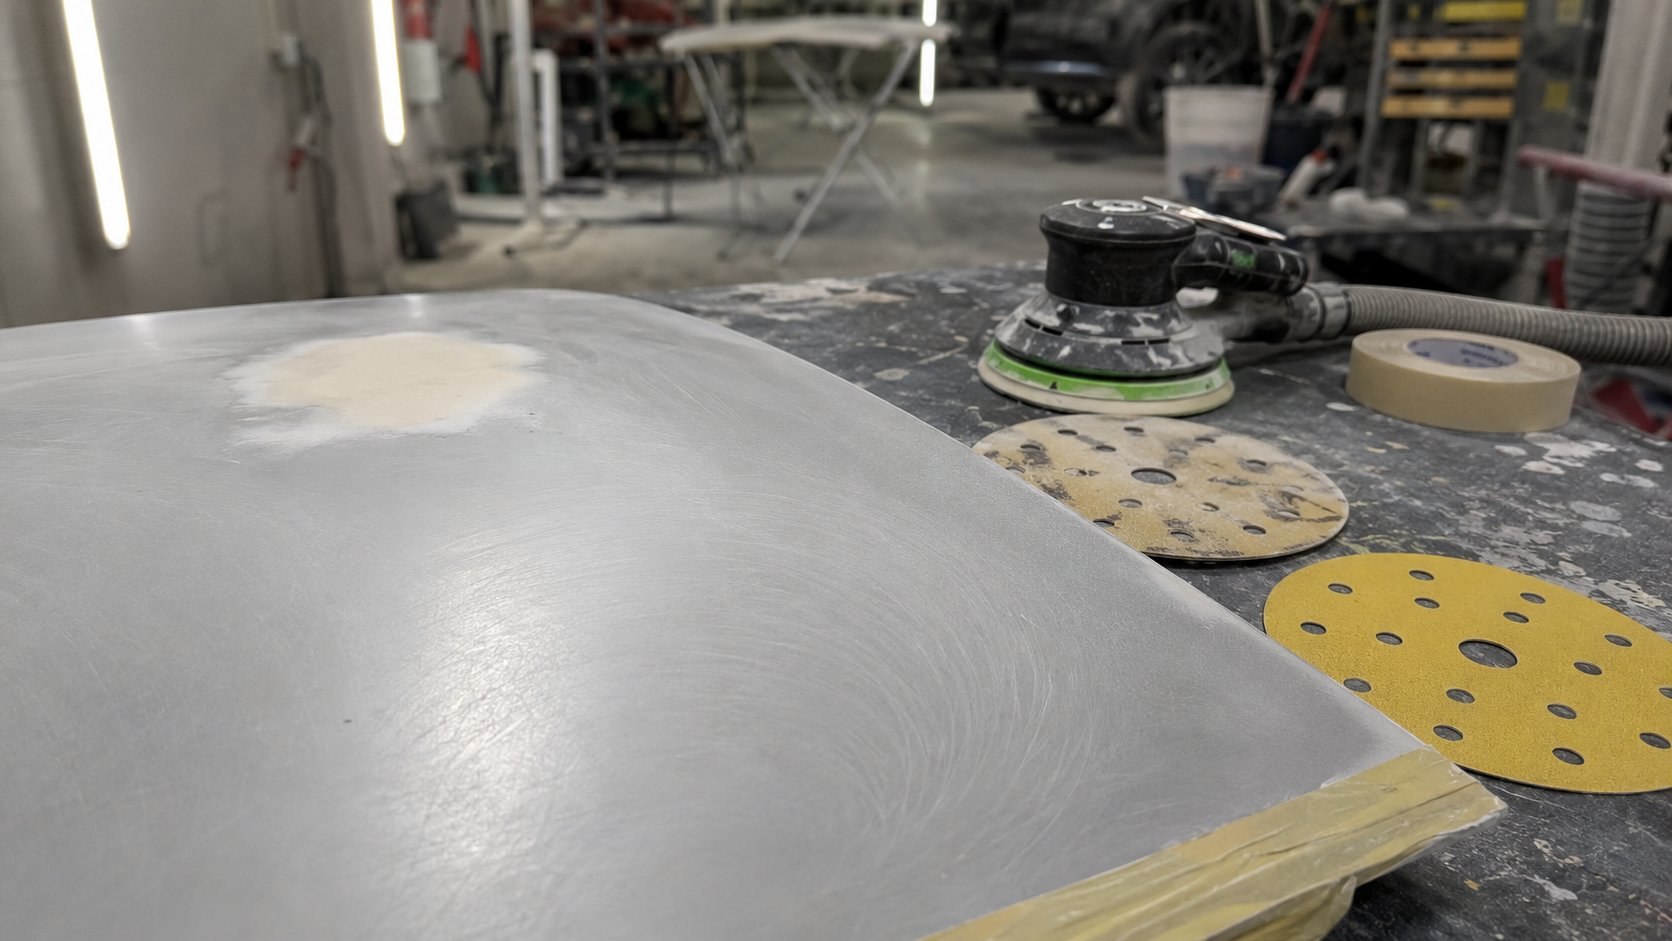
Pigtails look like short curly scratches, small hooks, tight swirls or spiral marks. They are different from straight-line block scratches and different from random gouges caused by dragging a dirty rag or bit of loose grit across the panel.
On filler, pigtails can show around the edge of the repair where the pad is riding unevenly. In primer, they often appear after guide coat or under stronger inspection lighting. During fine paint prep, they can be hard to spot until the surface is cleaned and viewed at an angle.
The giveaway is repetition. One random scratch may be contamination. Repeated curly marks across the sanding path usually mean the DA setup is repeating the same fault.
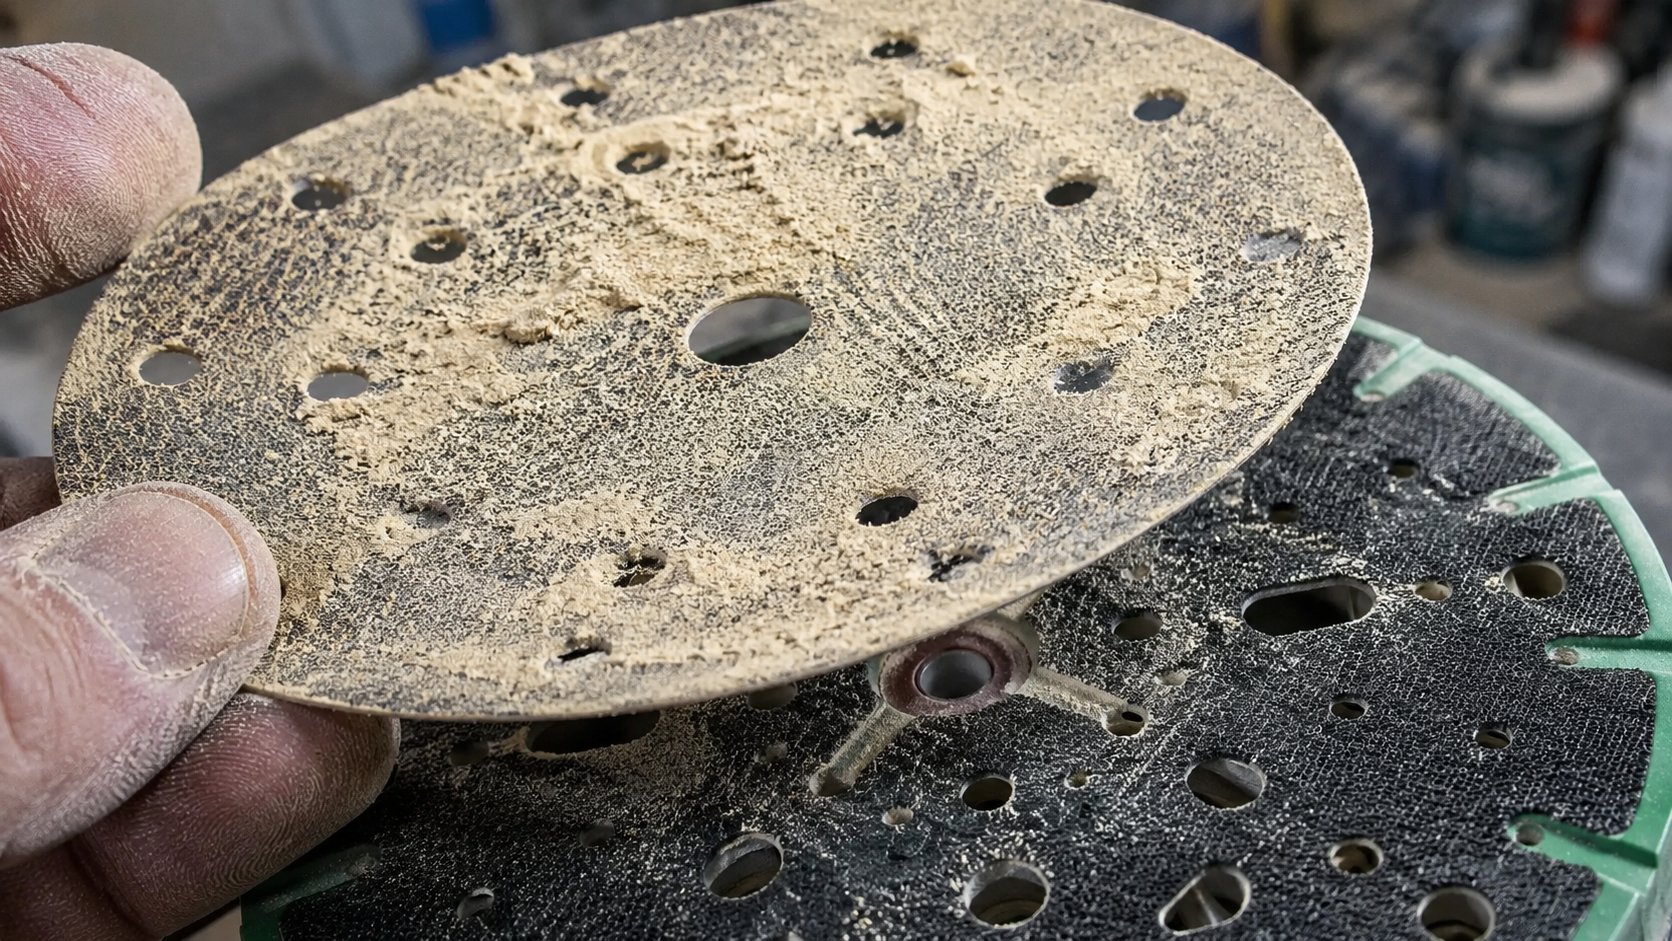
A loaded disc can make a good operator look bad. Once the abrasive face is packed, the scratch pattern becomes inconsistent.
Sanding pigtails: symptom table
Start with the mark you are seeing. Then check the likely cause before blaming the disc, the sander or the person using it.
Symptom on the panel
Likely cause
What to check first
Curly scratches after sanding primer
Dirty disc, loaded abrasive or trapped grit
Disc face, panel cleanliness and extraction
Pigtails on filler edges
Pad tilt, worn pad or too much pressure on the edge
Backing pad flatness, interface pad and DA angle
Marks get worse as the disc ages
Disc has lost cut or is loaded with filler dust
Fit a fresh disc and compare the scratch pattern immediately
Marks only appear on curves or swage lines
Pad too hard, no interface pad or operator riding the edge
Pad hardness, interface pad and hand position
Dust sits on the panel while sanding
Weak extraction, blocked holes or hose restriction
Extractor flow, hose, cuff seal and hole alignment
Deep scratches still visible after primer
Skipped grit step or poor scratch inspection
Grit sequence and whether old scratches were fully removed
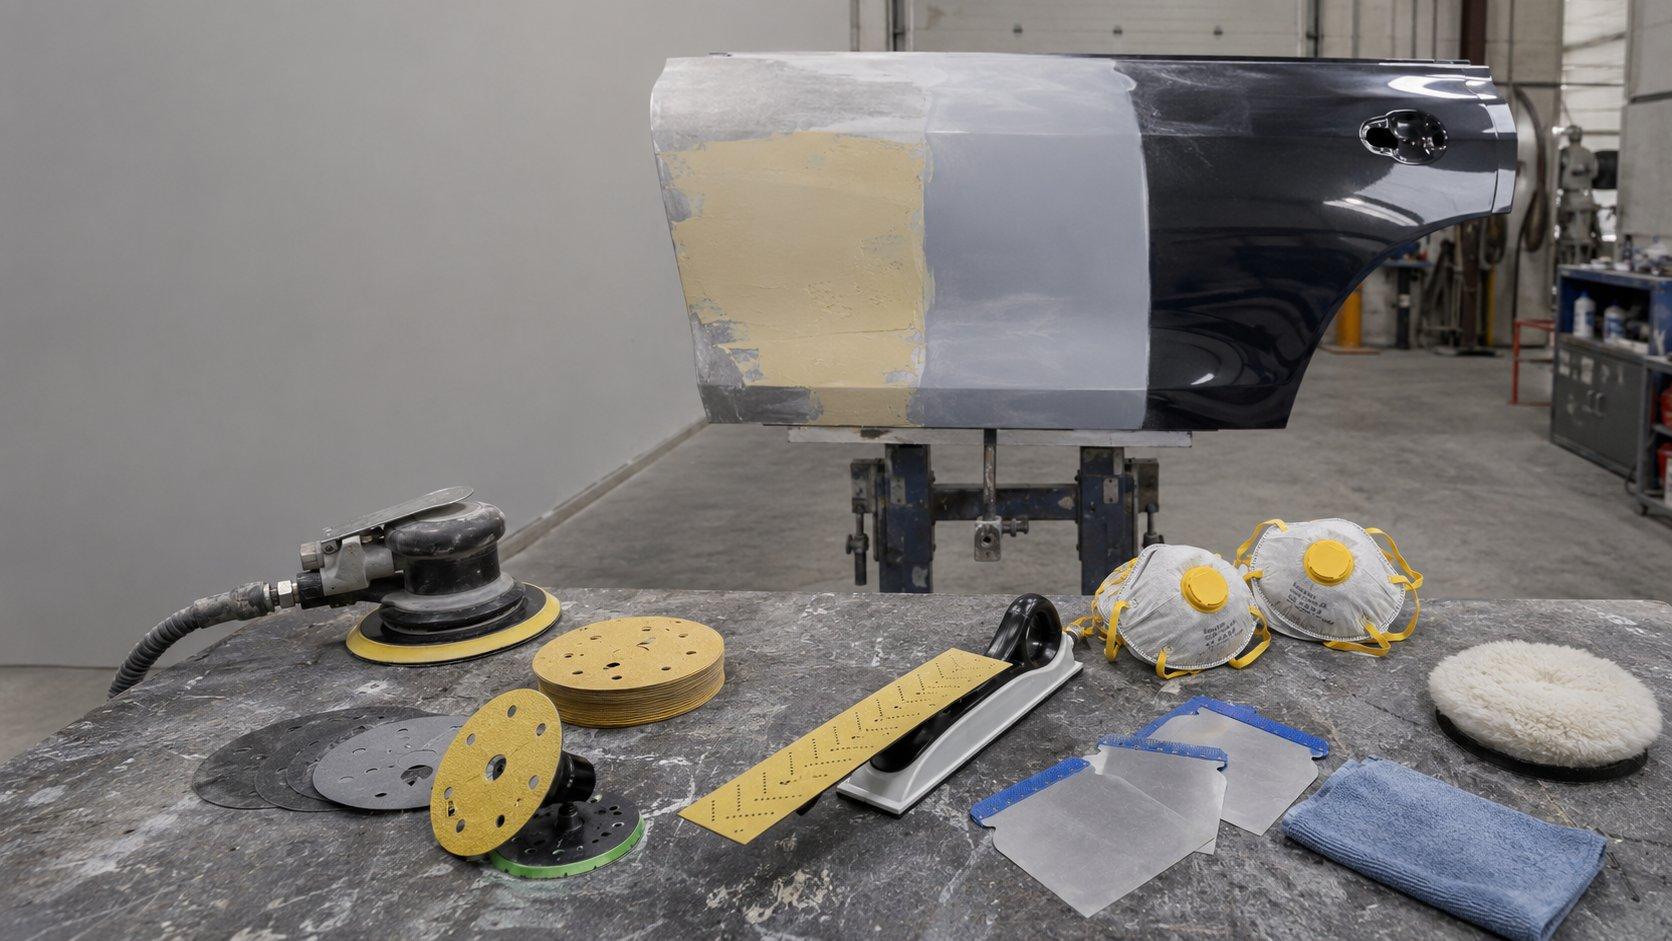
7 causes of pigtails when sanding filler, primer and paint prep
1. Dust or grit is trapped between the disc and the panel
This is the first check because it is common and easy to fix. A tiny piece of dried filler, old abrasive grain, primer dust or workshop grit can sit between the disc and the surface. Once the DA starts orbiting, that speck becomes a little cutting tool.
This often happens after a rushed grit change. The tech pulls off one disc, puts on the next and keeps going before the panel, pad and disc face are clean. It saves a few seconds and can cost half an hour.
Fix: blow off, vacuum and wipe between stages. Keep fresh discs face-up and clean. Do not drop them on a dusty bonnet, a filler-covered bench or beside old bog scrapings.
2. The sanding disc is loaded or worn
A loaded sanding disc has material packed between the abrasive grains. A worn disc has lost its cut. Both can leave inconsistent scratches because the disc stops shaving the surface cleanly and starts skating, heating or dragging debris.
On filler, a disc can load if the bog is still soft, the grit is too fine or the dust is not clearing. On primer, loading can happen when the primer has not cured enough for clean sanding or the operator keeps using a disc after it has gone shiny.
Fix: replace discs before they become glazed, patchy or packed with dust. For filler-heavy work, compare cost per job, not just price per disc. A disc that cuts cleanly for longer can be cheaper than a cheaper disc that causes rework.
Skipping grits feels efficient until the scratches come back. A finer disc cannot always remove deep scratches left by a much coarser step, especially if the operator is only smoothing the top of the scratch rather than cutting it out.
Filler shaping needs cut. Primer sanding needs consistency. Fine prep needs cleanliness and control. The exact process should follow the paint system and product data being used in the shop, but the principle stays the same: do not jump from heavy cutting straight to fine finishing and expect primer to hide everything.
Stage
Typical grit zone
Main pigtail risk
Initial filler shaping
P60-P80
Soft filler loading the disc or edge pressure digging in
Filler refining
P120-P180
Not fully removing coarse shaping scratches
Final filler and feather edge
P220-P320
Moving too fine before the shape is actually clean
Primer surfacer sanding
P400-P600, depending on paint system
Contamination, loaded primer dust or old scratches showing through
Fine prep and correction
P800 and finer, depending on the job
Dirty surface, wrong interface choice or uneven pressure
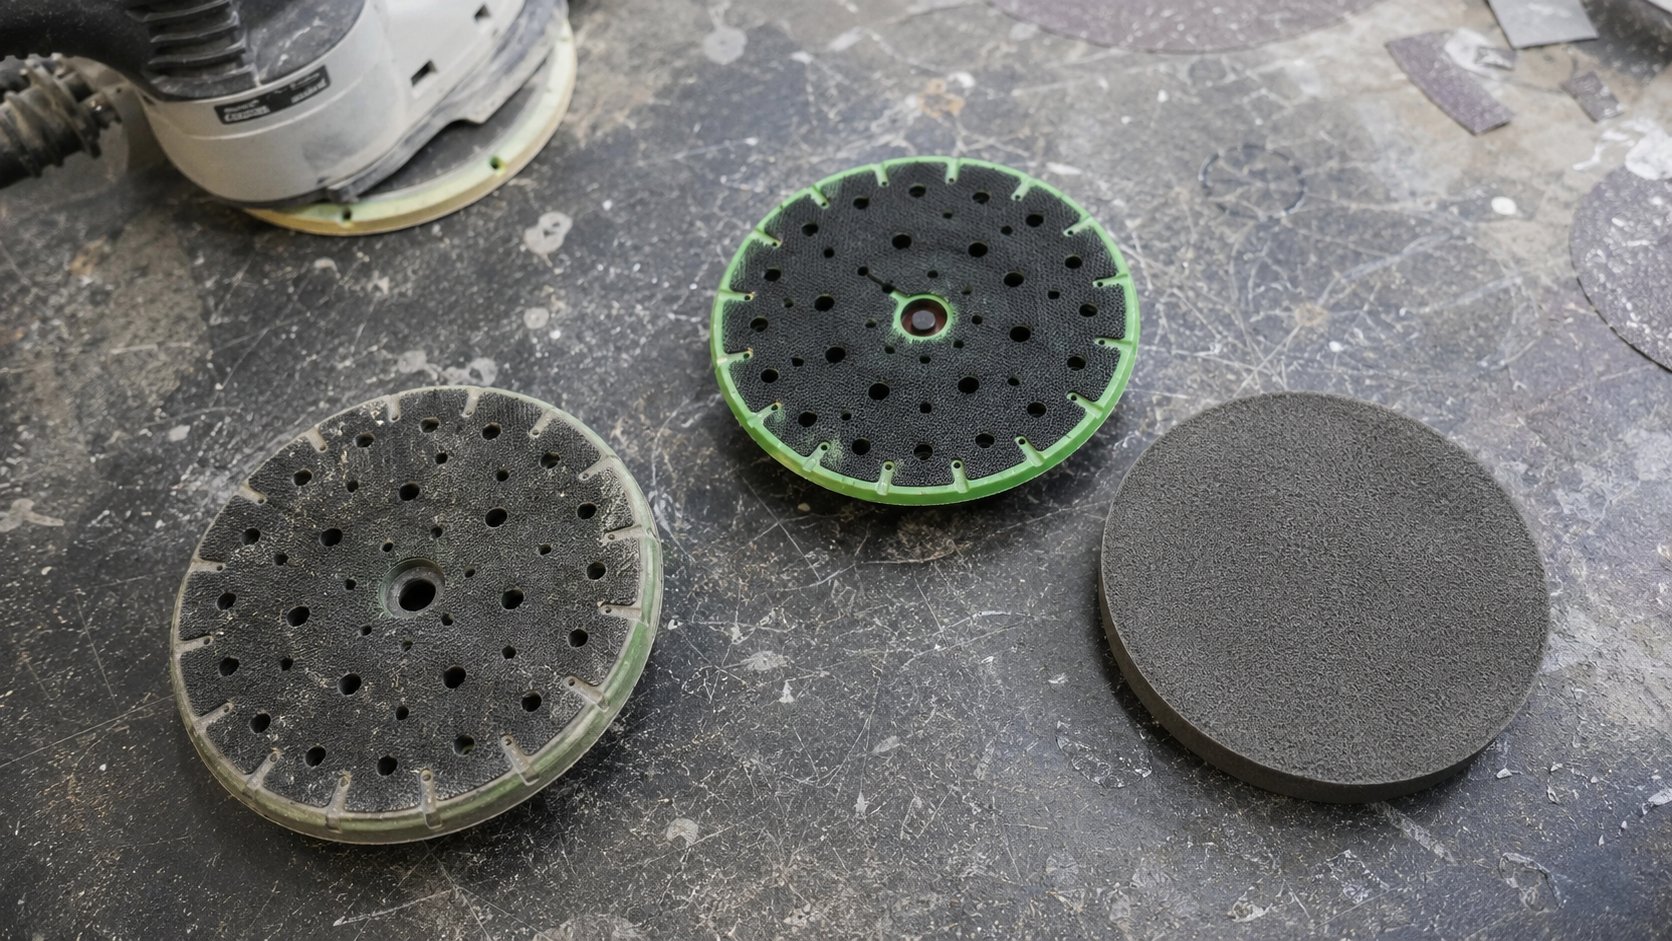
4. The backing pad is worn, too hard or wrong for the surface
A tired backing pad is easy to miss because it does not always look destroyed. The hooks flatten. The edge rounds over. The pad loses flatness. The disc starts to move, chatter or ride unevenly, then the scratch pattern follows.
Harder pads suit flatter cutting and heavier shaping where you need control. Softer interface pads help spread pressure on curves, edges, blends and finer prep. Problems start when one worn pad gets used for every stage and every surface.
Fix: inspect the hook face, edge shape and pad flatness. If the disc does not hold properly, the pad is past it. If pigtails appear on curves but not on flat sections, test a suitable interface pad before changing the whole abrasive system.
Pad wear can make a good disc look bad. Check the pad before blaming the abrasive.
5. Dust extraction is weak, blocked or mismatched
Pigtails love dust. When dust is not pulled away from the sanding face, it sits under the disc and gets dragged into the scratch pattern. The sander can sound normal while extraction at the panel is doing very little.
Check the boring stuff first: blocked hose, packed filter, loose cuff, poor seal, clogged pad holes, damaged pad ports and disc holes that do not line up with the backing pad. A 150mm disc can be the right diameter and still be the wrong setup if the extraction pattern does not match.
If the holes do not line up, the extractor cannot pull dust through the sanding face properly.
6. The operator is leaning too hard or tilting the DA
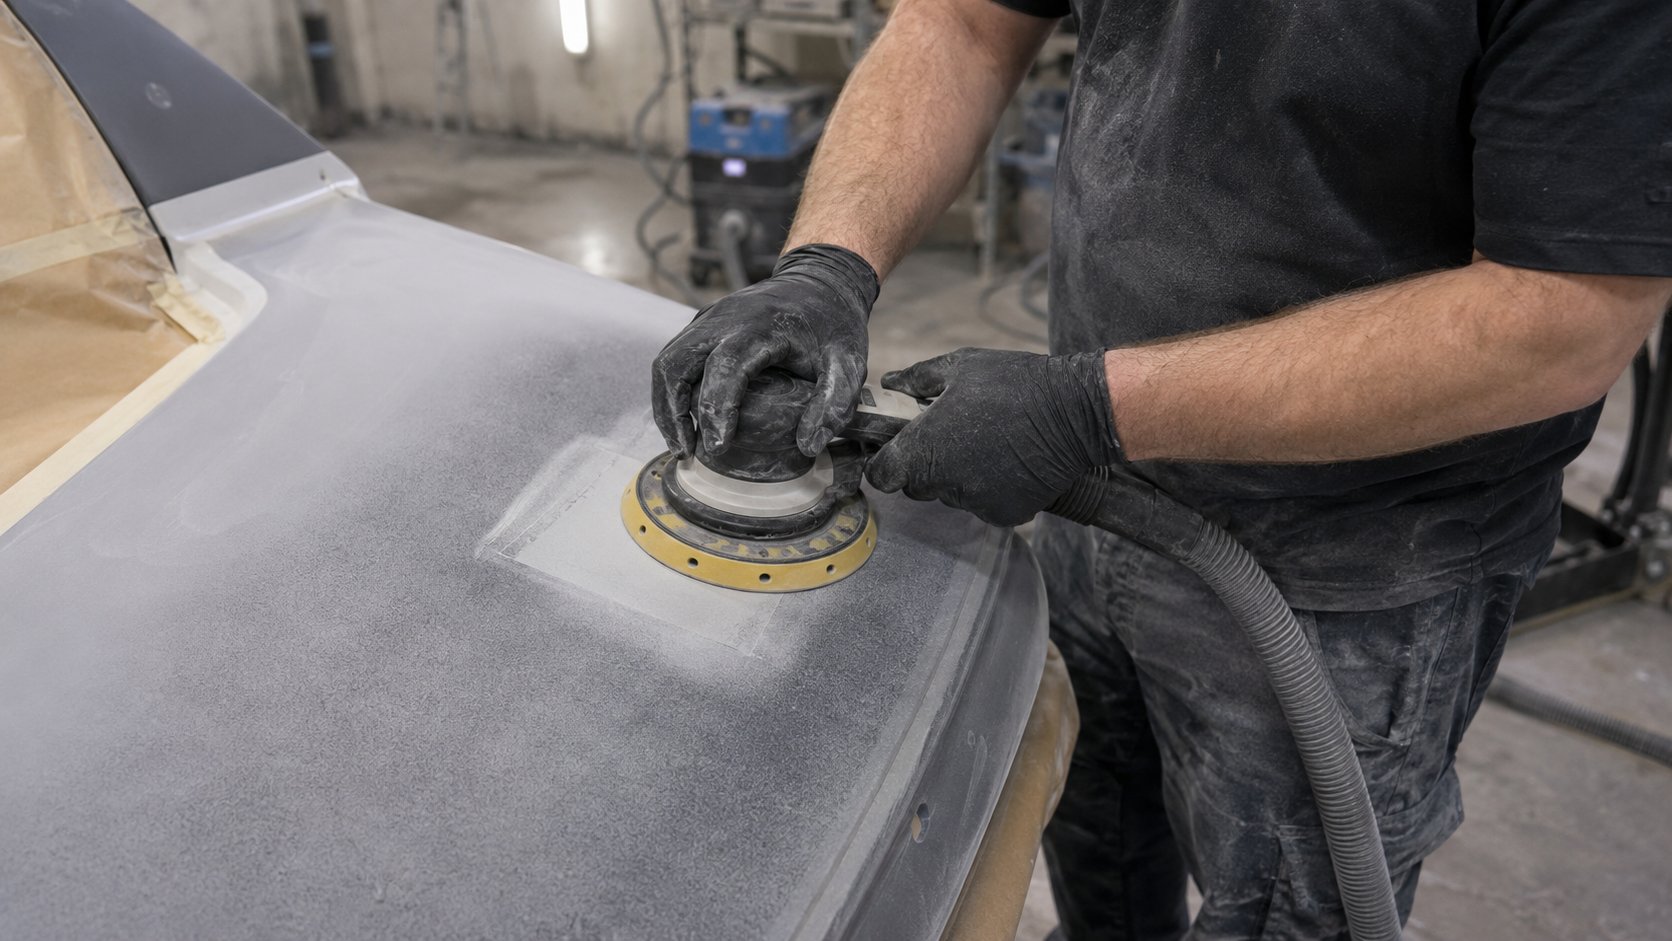
Heavy pressure does not make a dull disc cut like a fresh one. It creates heat, loads the abrasive, squashes dust into the face and makes the edge of the pad dig. That is how a small setup issue becomes a visible defect.
The DA should sit flat. The operator guides it. If the sander needs body weight to cut, something else is wrong: the grit is too fine, the disc is worn, the filler is too soft, the vacuum is weak or the pad is not making proper contact.
Fix: reduce pressure, keep the pad flat and use steady overlapping passes. On edges and body lines, slow down and let the pad follow the panel rather than riding one sharp point.
7. The setup does not match the surface: filler, primer or final prep
The same sanding habit does not suit every stage. Filler needs cut and shape control. Primer needs scratch consistency. Fine paint prep needs cleanliness, pad control and a surface that does not telegraph old marks.
Using the same pressure, same pad and same disc type across all three stages is asking for trouble. A setup that feels quick on bog can be too aggressive for primer edges. A soft interface that feels safe on curves can feel vague on a flat filler repair if used too early.
Fix: match the abrasive, pad and technique to the stage. Standardise the shop process where you can. When every tech uses a different disc, pad and grit sequence, diagnosing pigtails becomes guesswork.
Filler vs primer vs paint-prep pigtails
Pigtails when sanding filler
When pigtails show in filler, start with cure time, grit choice and disc loading. Soft bog clogs fast. A grit that is too fine can skate and pack up. Too much pressure on an edge can make the DA bite instead of cutting evenly.
Use guide coat when refining shape, especially before moving to the next grit. If the deeper scratches remain, the next stage will not magically remove them.
Pigtails in primer surfacer
Primer pigtails are often contamination or loading problems. Primer dust can build up quickly, especially if the extraction is weak or the primer has not cured enough for clean sanding.
Do not keep sanding with a disc that has started leaving shiny tracks, curly marks or inconsistent patches. Replace it, clean the surface, then inspect the scratch pattern before carrying on.
Pigtails during fine prep before paint
Fine prep is less forgiving. Old scratches, dirty discs and trapped dust can show later, especially on metallic colours or critical blends. Keep the surface clean, use the right interface where needed and avoid rushing the final grit step.
This is where shop habits matter. If one person blows dust across the bay, another drops discs on a dusty bench and a third keeps using worn pads, the final finish pays for it.
How to remove pigtails once they appear
Once you can see pigtails, stop. Do not keep sanding over them with the same disc and the same pressure. That usually spreads the defect and makes the scratch pattern harder to read.
Clean the panel. Blow off and vacuum dust before you inspect the marks.
Remove the suspect disc. Check the face for loading, shiny spots, torn abrasive or grit stuck in the surface.
Check the pad. Look for flattened hooks, rounded edges, blocked holes or poor disc hold.
Step back one grit if needed. If the pigtails are deeper than the current grit can remove cleanly, go back a step rather than polishing the tops of the scratches.
Re-sand a small area flat. Use a clean disc, light pressure and proper extraction.
Inspect before moving on. Use guide coat or proper lighting to make sure the marks are actually gone.
Do not rely on primer to bury obvious pigtails. Primer can hide a lot under poor light, but the scratch can come back once the surface is blocked, cleaned or painted. Fix the mark while you still control the prep stage.
The 30-second pigtail test
Before changing abrasive systems or blaming the sander, run this quick check on a clean test area.
Stop sanding as soon as repeated curly marks appear.
Remove the disc and inspect the abrasive face for loading, shiny patches or debris.
Check the backing pad hooks, edge shape and extraction ports.
Make sure the disc holes line up with the pad and extraction path.
Feel for suction at the pad face with the extractor running.
Clean the panel properly.
Fit a fresh disc in the correct grit.
Sand a small flat test patch with light pressure and a flat pad.
Inspect under guide coat or proper lighting before continuing.
A small test patch can separate a disc problem from a pad, extraction or technique problem.
If the pigtails disappear with a fresh disc and clean surface, the old disc was probably loaded, worn or contaminated. If the pigtails stay, look harder at pad condition, extraction, pressure, grit sequence or sander movement.
Is it the disc or the setup?
This is where shops waste money. They change abrasive brands when the pad is worn. Or they keep using cheap discs when the setup is fine but the disc simply cannot hold its cut.
What happens
More likely problem
What to do next
Fresh disc cuts clean, old disc leaves pigtails
Disc life, loading or contamination
Replace earlier and compare disc performance on the same job
Fresh discs still pigtail
Pad, extraction, pressure, grit sequence or sander issue
Run the 30-second test and inspect the pad system
Pigtails appear only on curves
Pad hardness, no interface pad or edge pressure
Test a suitable interface pad and flatten the DA angle
Dust sits on the panel with every disc
Extraction system
Check hose, filter, pad ports and hole pattern
Marks show after primer or paint
Skipped grit step or poor scratch inspection
Use guide coat and refine scratches before moving on
For shops buying discs in volume, the better question is not “which disc is cheapest?” It is “which setup gives the most consistent scratch pattern with the least rework?” Start there and the buying decision gets clearer.
What to check first before you keep sanding
When pigtails appear, do not keep sanding and hope the next stage sorts it out. Use this order:
Clean the panel. Remove loose dust, grit and old abrasive debris.
Change the disc. A loaded disc will keep repeating the same fault.
Inspect the pad. Look for rounded edges, flat hooks and poor disc hold.
Check extraction. Confirm the hose, filter, cuff and hole pattern are working together.
Reduce pressure. Keep the DA flat and let the abrasive do the cut.
Check the grit step. Make sure the previous scratches were actually removed before moving finer.
It sounds basic because it is. Most sanding defects are easier to solve once you stop and check the system in order.
Want a cleaner sanding setup across the whole shop?
If your team is fighting repeated pigtails, loading or scratch inconsistency, standardising the discs, pads and grit sequence usually does more than swapping one product at a time.
FAQ: sanding pigtails in filler, primer and paint prep
What causes pigtails when sanding filler?
Pigtails when sanding filler are usually caused by loaded discs, trapped filler dust, soft or uncured bog, too much pressure, a worn backing pad or using a grit that is too fine for the stage. Start by cleaning the panel, fitting a fresh disc and checking the pad before you keep sanding.
Can poor dust extraction cause pigtails?
Yes. Poor extraction lets dust stay under the disc. That dust can then be dragged around the panel in a tight spiral scratch pattern. Check the extractor hose, filter, cuff seal, backing pad holes and disc hole alignment.
Does a worn backing pad cause pigtails?
Yes. A worn backing pad can create uneven contact, poor disc hold and edge pressure. If the hook face is flattened, the edge is rounded or the pad is no longer flat, replace it or test the correct interface pad for the surface.
Are pigtails caused by using the wrong grit?
They can be. Jumping too quickly to a fine grit can leave earlier scratches behind, while using a grit that is too fine on filler can load the disc and make it skate. Follow a proper grit progression for filler, primer and pre-paint prep.
How do I stop pigtails with a DA sander?
Keep the pad flat, reduce pressure, use a clean and sharp disc, match the disc holes to the backing pad, keep extraction working and clean between grit steps. If pigtails remain with a fresh disc, inspect the pad, interface pad and grit sequence.
Can loaded sanding discs cause pigtails?
Yes. A loaded disc stops cutting cleanly. It can drag packed dust, dried filler or primer debris across the panel and leave curly scratches. Replace loaded discs before they become shiny, patchy or clogged.
How do you remove pigtails after they appear?
Clean the panel, replace the suspect disc, inspect the backing pad, then step back one grit if the scratches are too deep for the current grit to remove. Re-sand a small clean area, inspect under proper light or guide coat, then continue only once the marks are gone.
Why do pigtails show up after primer or paint?
Pigtails can hide during prep if the lighting is poor, the surface is dusty or guide coat was skipped. Primer and paint can make inconsistent scratches more visible, especially on critical colours and metallic finishes.
Article details: Written for Australian panel shops, spray painters, prep teams and workshop buyers using 150mm DA sanding systems for filler, primer and paint preparation.
Hard vs Medium vs Soft Backing Pads: Which 150mm DA Pad for Filler, Primer, Curves and Paint Prep?
Not sure which 150mm DA backing pad to run on bog, primer, curves or paint prep? This practical guide breaks down hard, medium, soft and interface pads for real panel-shop work.


.png&w=2048&q=75)